


Before starting with CSS selectors I would assume that you have some basic knowledge of HTML tags. CSS is all about targeting an element from the web page and styling it. These include the background color of the page or para or any tag, padding, styling font size or button size, hover effects, and a lot more.
 I will walk you through each selector through an example of a feedback form. Let's create a basic index.html file.
Wait! before that, there are a few things to know.
So there are two ways to write CSS one is inside the style tag and another is to make a separate style.css. But here in this example, I have taken a style tag. Ideally having a separate CSS file makes it clean and links it, Example:
<link href="style.css" rel="stylesheet" />
The link tag is used to relate the current document with the current one and the ‘rel’ attribute defines the relationship between the current and the linked document.
Here we are covering the box model type which includes two components inline and block boxes. Block boxes are ones that occupy space in the entire block even after the text or input is finished, it reserves their own space whereas inline takes only space till the end of some text or input.
Let me show an example
<!DOCTYPE html>
<html lang="en">
<head>
    <meta charset="UTF-8">
    <meta http-equiv="X-UA-Compatible" content="IE=edge">
    <meta name="viewport" content="width=device-width, initial-scale=1.0">
    <title>CSS Assignment</title>

    <style>
        h1,span {
            background-color: #E8BD0D;
        }

    </style>
</head>
<body>
    <div>
        <h1 align="left">Feedback Form</h1>
    </div>
    <div>
        <form action="">
            Name: <input type="text" name="" id="" placeholder="Name"> <br> <br>
            <span>Email: <input type="email" name="" id="" placeholder="Email"> <br> <br></span>
            Password: <input type="password" name="" id="" placeholder="Password"> <br> <br>

</form>
    </div>

</body>
</html>

Here h1 is a block element and span is an inline box element.
Now let's dive into selectors.

Universal Selector
Universal selector is where we use and styling made is applicable to the whole web page. In technical words, it selects all elements present on the web page. Even | also gives the same results. It is useful with namespaces. Namespaces will cover it in the future. There are more in selectors.
Syntax:
* { style properties}
Example:
/* Universal selector */

        * {
            background-color: #E8BD0D;
            color:  #6F00ED;
            padding: 2;
        }
Here we can see a thing for background color and color we pass a hexadecimal code of 6 digits. We can also write the names like red, blue, and green but browsers wise these colors can slightly vary so we prefer hex code because it will maintain standardization throughout all browsers. We can pick colors from here. Padding means all 4 side space is given by 2.
Individual selector or Type Selector
Here we see in the p example, we select element-wise styling.
Syntax :
element { style properties }
Example:
 p {
            background-color: #fff;
        }
Class selector
Give a class name for the desired element and all elements that have the same class name will be styled. It matches the elements based on their class name. Class name always starts with a . (dot).
Syntax :
.class_name { style properties }
Example:
 /* class selector */

        .rating1{
            background-color: #538FFB;
        }
ID Selector
In the same way as a class element, it selects when we element id value matches the element id value. Here we use # (hash) before selecting any id.
Syntax :
#id_value { style properties }
Example:
/* ID selector */
        #rating_id{

            background-color:#CAD5E2;
            color: #0D0D0D;
        }
We usually use ID when we want to uniquely identify but the class can be used for a general purpose.
Chained selector
We selected 2 class names. Don't give spaces here. Two is the minimum you can add as much as you want to.
Syntax:
Classname1.classname2{ style properties }
Example:
/* Chained selector */
        .success.text-white {
            background-color: green;
            color: black;
        }
Combined selector or selector list
It combines 2 elements with the same styling and is separated by ","(comma).
Syntax:
element 1, element2, element3 .. { style properties }
Example:
/* Show block vs inline - Combined Selector */
        h1, span {
            background-color:  #E1A2B8;
        }
Inside an element or Descendent Combinator
Styling is selected on the decedent value using their element names and it's separated by space, where form - parent, div - child, ul - grandchild, li is a grand grandchild. It should exist in these sequences only. There is also another ul and li. It did not select that because it's in sequence form→ul→ li.
Syntax:
Element1 element2 { style properties }
Example:
/* Inside an element or Descendent combinator  */
        form div ul li {
            list-style-type: square;
        }
Direct child or Child Combinator
In a direct child, element names are separated by “>” which defines its hierarchy. As per syntax element1 is the parent, element2 is the child and element3 is the grandchild. It should exist in that sequence only as selected.
Syntax :
Element1 > element2 > element3 { style properties }
Example:
 /* Direct child or child combinator  */
        form > ul > li {
            background-color: #fff;
        }
Sibling + or Adjacent sibling Combinator
In the adjacent sibling combinator the styling is applicable on the second element here which is p - paragraph, so wherever there will be a para after ul (unordered) basically on element2 styling will be applied. It should be in that sequence only as selected and it's the next immediate one.
Syntax :
Element1 + element2 { style properties }
Example:
 /* Sibling + or Adjacent Sibiling Combinator */
        ul + p {
            background-color: #35BDD0;
        }
Sibling ~ or General Sibling Combinator
It also works similarly to adjacent siblings except we use ~. The element2 can come after subsequent children.
Syntax :
Element ~ element2 { style properties }
Example:
  /* Sibling + or General sibling combinator */
        p ~ div{
            font-family: 'Courier New', Courier, monospace;
            font-size: large;
            font-style: italic;
        }
As per the above example wherever there is a div after para the font family has changed for it.
Now let's learn about Pseudo classes.
::before
It is usually used to add content before any element. So wherever we have used span element before that Test is added.
Syntax:
Element1: element2: …::before{ style properties }
Example:
/* Pseudo classes - Before  */
        span::before{
            content: "Test ";

        }
::after
After the element style properties will be added. Here it's after the p tag.
Syntax:
Element1: element2: …::after{ style properties }
Example:
/* Pseudo classes - After  */
        p::after{
            background-color: blue;
            content: "Dummy";
            color: #CAD5E2;
        }
:hover
When we hover over an element we will see some styling properties being applied.
Syntax:
Element1:hover { style properties }
Example:
 /* Pseudo classes - Hover  */
        h1:hover{
            background-color: #115bc3;
            color: #CAD5E2;
        }
<!DOCTYPE html>
<html lang="en">
<head>
<meta charset="UTF-8">
<meta http-equiv="X-UA-Compatible" content="IE=edge">
<meta name="viewport" content="width=device-width, initial-scale=1.0">
<title>CSS Assignment</title>
<style>
/* individual selector */
p{
background-color: #fff;
}
/* Universal selector */
* {
background-color: #E8BD0D;
color: #6F00ED;
padding: 2;
}
/* class selector */
.rating1{
background-color: #538FFB;
}
/* ID selector */
#rating_id{
background-color:#CAD5E2;
color: #0D0D0D;
}
/* Chained selector */
.success.text-white {
background-color: green;
color: black;
}
/* Show block vs inline - Combined Selector */
h1, span {
background-color: #E1A2B8;
}
/* Inside an element or Decendent combinator */
form div ul li {
list-style-type: square;
}
/* Direct child or child combinator */
form > ul > li {
background-color: #fff;
}
/* Sibling + or Adjacent sibiling combinator */
ul + p {
background-color: #35BDD0;
}
/* Sibling + or General sibiling combinator */
p ~ div{
font-family: 'Courier New', Courier, monospace;
font-size: large;
font-style: italic;
}
/* ************************************************ */
/* Pseudo classes - Before */
span::before{
content: "Test ";
}
/* Pseudo classes - After */
p::after{
background-color: blue;
content: "Dummy";
color: #CAD5E2;
}
/* Pseudo classes - Hover */
h1:hover{
background-color: #115bc3;
color: #CAD5E2;
}
</style>
</head>
<body>
<div>
<h1 align="left">Feedback Form</h1>
</div>
<div>
<form action="">
Name: <input type="text" name="" id="" placeholder="Name"> <br> <br>
<span>Email: <input type="email" name="" id="" placeholder="Email"> <br> <br></span>
Password: <input type="password" name="" id="" placeholder="Password"> <br> <br>
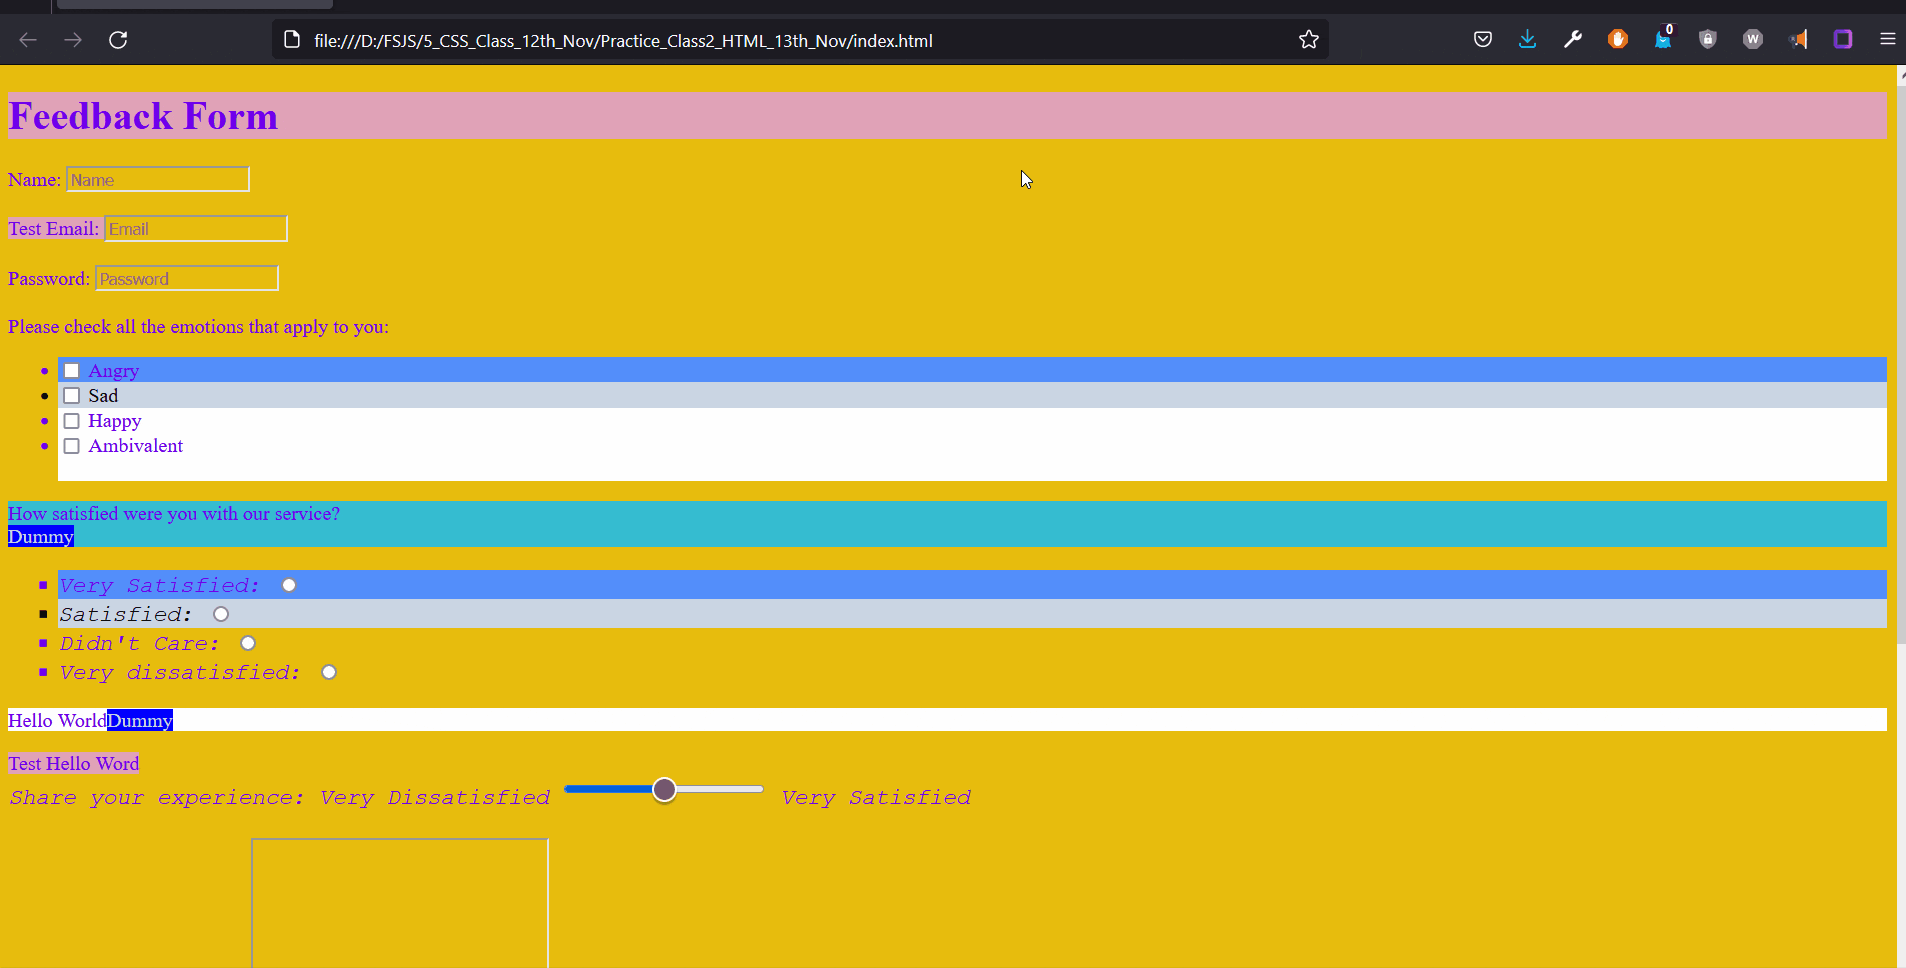
Please check all the emotions that apply to you: <br>
<ul>
<li class="rating1"><input type="checkbox" name="emotions" id=""> Angry <br></li>
<li id="rating_id"><input type="checkbox" name="emotions" id=""> Sad <br></li>
<li><input type="checkbox" name="emotions" id=""> Happy <br></li>
<li> <input type="checkbox" name="emotions" id=""> Ambivalent <br> <br></li>
</ul>
<p>How satisfied were you with our service? <br></p>
<div>
<ul>
<li class="rating1">Very Satisfied: <input type="radio" name="satisfaction" id=""></li>
<li id="rating_id"> Satisfied: <input type="radio" name="satisfaction" id=""></li>
<li>Didn't Care: <input type="radio" name="satisfaction" id=""></li>
<li>Very dissatisfied: <input type="radio" name="satisfaction" id=""></li>
</ul>
</div>
<p>Hello World</p>
<span>Hello Word </span>
<div>
Share your experience: Very Dissatisfied <input type="range" name="" id=""> Very Satisfied
<br> <br>
Further comments:
<textarea name="story" id="" cols="30" rows="10"></textarea> <br> <br>
Bio Photo: <input type="image" src="" alt=""> <br> <br>
Any files: <input type="file" name="" id=""> <br> <br>
</div>
Select Location: <select name="locations" id=""> <br> <br>
<option value="kochin"> Kochin </option>
<option value="Delhi"> Delhi </option>
<option value="mumbai"> Mumbai </option>
<option value="kolkata"> Kolkata </option>
<option value="chennai"> Chennai </option>
<option value="hyd"> Hyderabad </option>
<option value="Bangalore"> Bangalore </option>
</select>
<br> <br>
Select date: <input type="date" name="" id=""> <br> <br>
Enter current time: <input type="time" name="" id=""> <br> <br>
Search: <input type="search" name="" id="" min="11:00" max="00:00"> <br> <br>
Select color: <input type="color" name="" id="">
<input type="hidden" name="" value="Sequence 1 "> <br> <br>
<span><input class="success text-white" type="submit" value="Submit"></span>
<input type="reset" value="Reset">
</form>
</div>
</body>
</html>
Hope it was helpful. See you soon!

GitHub link : Source code
Resources